
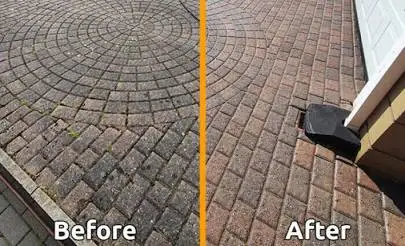
How to Prevent Weeds from Ruining Your Block Paving in Northampton: Expert Tips
A professionally laid block-paved driveway instantly elevates your home’s curb appeal and adds real value to your property. But as any homeowner knows, it doesn’t take long for windblown seeds to settle into the joints, leading to unsightly green shoots breaking up your beautiful patterns.
At AAS Group Construction, we have spent more than 15+ years installing premium driveways, patios, and commercial paving across Northampton. We know that the secret to a weed-free driveway isn’t about working harder; it’s about using the right techniques.
If your paving is looking weathered or starting to sprout, follow this step-by-step professional restoration routine to take back control.
The Professional Block Paving Restoration Routine
To eliminate existing weeds and protect your driveway long-term, order matters. Skipping ahead or applying sealant over dirty joints will lock in the mess rather than fix it.
3 Long-Term Prevention Tips From the Pros
If you want to minimize your weekend maintenance, keep these three expert rules in mind:
-
Regular Sweeping is Your Best Weapon: Simply sweeping your driveway with a stiff broom once a week disrupts newly dropped seeds before they have a chance to germinate. It takes two minutes but saves hours of weeding later.
-
Avoid Using Boiling Water Regularly: While boiling water can kill a single weed instantly, it washes away the essential jointing sand over time, weakening the structure of your driveway.
-
Invest in Professional Installation: The best defense against weeds is a flawless installation. A properly dug sub-base, commercial-grade weed membranes, and expertly compacted sand joints mean fewer places for weeds to thrive in the first place.
Trade Secret: Look for “polymeric” jointing sand if you are re-sanding an older driveway. It contains special additives that activate with water to form a firm, rubbery mortar joint that weeds absolutely hate.
Let the Northampton Paving Experts Take Care of It
If your driveway or patio has been overtaken by weeds and moss, restoring it by hand can be back-breaking work. Sometimes, the quickest and most cost-effective solution is to bring in the professionals.
At AAS Group Construction, we handle everything from complete driveway overhauls and professional groundworks to brand-new, low-maintenance block paving installations. We combine 15 years of industry experience with commercial-grade equipment to deliver pristine results that last.
Ready to transform your home’s exterior?
Call our friendly Northampton team today on 01604 385 166 or email us at info@aasgroup.co.uk for a free, transparent quote on a new driveway or landscaping project!